


We've all created projects before. It's the same old story.
Run npm init [-y]
After that run npm install <so-so-packages>
Then, we have to create the files and folders and type some starter code. After that, there is also version control, configuration files, linters, etc to setup.
What if we can simplify that process?
There are already several generator kits out there, but in this article, we're going to build our own custom generator.
Why? Because we can.
Let's get started.
Step 1: Create a project folder and run npm init -y
Step 2: Create a bin folder and put a file called generator inside.
This is so that we can type generator in our command line to start the process.
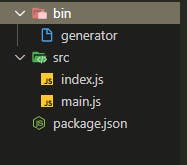
Step 3: Create an src folder and put two files index.js and main.js
Our directory structure should look like this
Step 4: In the package.json, add/edit the following fields
name: "< npm-username >/generator"main: "src/index.js"bin:{ "<npm-username>/generator": "bin/generator", "generator": "bin/generator" }publishConfig:{ "access": "public" }
This is what mine looks like now,
{
  "name": "@irene-24/generator",
  "version": "1.0.0",
  "description": "",
  "main": "src/index.js",
  "scripts": {
    "test": "echo \"Error: no test specified\" && exit 1"
  },
  "bin": {
    "@irene-24/generator": "bin/generator",
    "generator": "bin/generator"
  },
  "publishConfig": {
    "access": "public"
  },
  "keywords": [],
  "author": "",
  "license": "ISC"
}
Step 5: Run npm install esm. This will allow us to use the import syntax in our code.
Step 6: In the index.js file. Let's create a function cli and export it.
export function cli ()
{
    console.log( "Hello" );
}
Step 7: In the generator file file. Type this
#!/usr/bin/env node

require = require("esm")(module /*,options*/);
require("../src/index").cli();
This StackOverflow post explains what #!/usr/bin/env node is doing.
Step 8: Now run npm link in the command line.
Test the code by typing generator in any shell window. Hello world should be printed on the console.
Step 9: Now let's install two packages
npm install chalk inquirer
The inquirer package will let us prompt the user for project configuration. The chalk package adds some styling to the command line text.
Step 10: Create a new file questions.js, in the src folder, that will handle asking our questions.
Inside the questions.js file, import chalk and inquirer. Also, create an askQuestions function that will be asynchronous and export it.
You can see documentation for inquirer and chalk
At this point, we need to know what kinds of questions we want to ask. For this generator, The questions I will ask are:
Enter project name: This must start with a letter, and a folder with this name must not exist in the directory from where we are runninggenerator.Choose a project template: We can include a template folder in the root of the project generator, the folder will contain template code for different kinds of projects. For now, I just have two templates. One for javascipt-express-mongo-node {calledjemn} and the other for basic html/css/js.
We can also allow the user to choose custom templates by providing a full path to the folder containing the template they want.
Init Git: Ask the user if they want to initialize git.Install Dependencies: Ask the user if they want to install dependencies as soon as the project is being created.Select package manager: Use npm or yarn in the generated project.
Step 11: Let's create a utility function checkPath to help us check if a certain path exists.
I'm going to put it into a file of its own, so that I can reuse it if I need to. This file will live in the src folder and is named utils.js
utils.js
import fs from "fs";

const checkPath = path =>
{
    try
    {
        return fs.existsSync( path );
    }
    catch ( err )
    {
        console.error( err );
    }
};


export
{
    checkPath
};
Step 12: In our askQuestions function let's create our set of questions. The answers to each question will be collated in an object that we conveniently call answers
questions.js
import chalk from "chalk";
import inquirer from "inquirer";
import path from "path";
import { platform } from "os";
import { checkPath } from "./utils";

async function askQuestions ()
{
    /* Just a helpful message */
    console.log( chalk.hex( "#e7c99a" )( "Use the up and down arrow keys to navigate multi-choice questions" ) );

    /*Initial set of questions*/
    const questionsSetA =
        [
            {
                name: 'project-name',
                type: 'input',
                message: 'Project name: ',
                validate: function ( input )
                {
                    let valid = true;

                    /*Reg ex to ensure that project name starts with a letter, includes letters, numbers, underscores and hashes */
                    if ( /^[a-z](?:_?[a-z0-9\-\_\d]+)*$/i.test( input ) )
                    {
                        valid = valid && true;
                    }
                    else
                    {
                        return 'Project must \n 1) start with a letter \n 2) name may only include letters, numbers, underscores and hashes.';
                    }

                    const path = `${ process.cwd() }/${ input }`;

                    /*Check that no folder exists at this location */
                    if ( checkPath( path ) )
                    {
                        return 'Project with this name already exists at this location';
                    }
                    else
                    {
                        return valid && true;
                    }
                }
            },
            {
                type: "list",
                name: "template",
                message: "Please choose a project template to use",
                choices:
                    [
                        "Node-Express-Mongo-JS",
                        "HTML,CSS,JS",
                        "Custom"
                    ]
            }
        ];

    /*Allow user to input template path */
    const useCustom =
        [
            {
                name: 'template-path',
                type: 'input',
                message: 'Enter full path to custom template folder ',
                validate: function ( input )
                {
                    let tPath = input;

                    if ( platform() === "win32" )
                    {
                        tPath = path.win32.normalize( input );
                    }

                    if ( checkPath( tPath ) )
                    {
                        return true;
                    }
                    else
                    {
                        return "Template path does not exist.";
                    }
                }
            },
        ];

    /*Init git and set up a package manager if needed*/
    const questionsSetB =
        [
            {
                type: "confirm",
                name: "git",
                message: "Initialize a git repository (Defaults to false)?",
                default: false
            },
            {
                type: "confirm",
                name: "pkg",
                message: "Use a package manager? (Defaults to false) ",
                default: false
            }
        ];

    const questionsSetC =
        [
            {
                type: "list",
                name: "package-manager",
                message: "Please choose a package manager (Default is npm)",
                choices: [ "npm", "yarn" ],
                default: "npm"
            },
            {
                type: "confirm",
                name: "install",
                message: "Install dependencies? (Defaults to false) ",
                default: false
            },
        ];

    try
    {
        /*Actually ask the questions*/
        let answersA, answersB, answersC, answersD;

        answersA = await inquirer.prompt( questionsSetA );

        if ( answersA.template === "Custom" )
        {
            answersB = await inquirer.prompt( useCustom );
        }

        answersC = await inquirer.prompt( questionsSetB );

        if ( answersC.pkg )
        {
            answersD = await inquirer.prompt( questionsSetC );
        }

        /*Collate answers*/
        const answers =
        {
            ...answersA,
            ...answersB,
            ...answersC,
            ...answersD
        };

        return answers;

    }
    catch ( err )
    {
        if ( err )
        {
            switch ( err.status )
            {
                case 401:
                    console.error( '401' );
                    break;
                default:
                    console.error( err );
            }
        }
    }

}

export default askQuestions;
and in our index.js
import askQuestions from "./questions";

export async function cli ()
{
    const options = await askQuestions();
    console.log( options );
}
When we run this code in any terminal with the generator command, we are prompted with a set of questions to answer. Play around with different configurations.
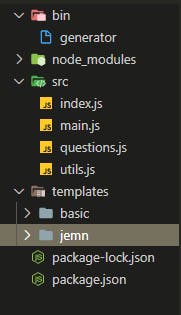
My output

The current state of my work folder
Now that we can configure our options, it's time to actually generate our project.
Step 1: In the root of our project run npm install execa listr ncp pkg-install
execawill help us execute some commands e.ggit init.listrallows us to define a list of tasks we want to run.ncpwill help us copy folders and files.pkg-installwill help us install our dependencies in the generated project.
Step 2: In utils.js. Add two functions editPackageJSON and initGit
utils.js
import fs from "fs";
import execa from 'execa';

/**
 * Check if a file/folder path exists
 * @param {string} path Path to check
 *
 */
const checkPath = path =>
{
    try
    {
        return fs.existsSync( path );
    }
    catch ( err )
    {
        console.error( err );
    }
};


const mapToTemplates =
{
    "Node-Express-Mongo-JS": "jemn",
    "HTML,CSS,JS": "basic"
};


async function initGit ( options )
{
    const result = await execa( 'git', [ 'init' ], {
        cwd: options.targetDirectory,
    } );
    if ( result.failed )
    {
        return Promise.reject( new Error( 'Failed to initialize git' ) );
    }
    return;
}

async function editPackageJSON ( options )
{

    const targetDir = options.targetDirectory;
    let jsonFile;

    fs.readFile( `${ targetDir }/package.json`, function ( err, data )
    {
        /*If no package.json, this will be skipped*/
        if ( !err )
        {
            jsonFile = JSON.parse( data );
            jsonFile.name = options.name;

            fs.writeFileSync( `${ targetDir }/package.json`, JSON.stringify( jsonFile, null, "\t" ), ( err, data ) =>
            {
                if ( err )
                {
                    throw new Error( "Unable to update package.json" );
                }
            } );
        }

    } );
}

export
{
    checkPath,
    mapToTemplates,
    initGit,
    editPackageJSON
};
Step 3: In main.js. Type in the following:
import chalk from "chalk";
import fs from "fs";
import ncp from "ncp";
import path from "path";
import { promisify } from "util";
import Listr from 'listr';
import { projectInstall } from 'pkg-install';
import
{
    initGit,
    mapToTemplates,
    editPackageJSON,
    checkPath
} from "./utils";
const access = promisify( fs.access );
const copy = promisify( ncp );

async function copyTemplateFiles ( options )
{
    return copy( options.templateDirectory, options.targetDirectory,
        {
            clobber: false
        } );
}

async function createProject(options)
{

}


export default createProject;
util is an inbuilt module. You do not have to install it.
Step 3: Now we need to configure our target path (where our project will live), and our source path (the path of our templates). We also need to check if we have access to the templates folder.
async function createProject ( options )
{

    const config =
    {
        name: options[ "project-name" ],
        template: options[ "template" ],
        manager: options[ "package-manager" ],
        git: options.git,
        pkg: options.pkg,
        install: options.install,

    };

    let templateDirectory;

    if ( options[ 'template-path' ] )
    {
        templateDirectory = options[ 'template-path' ];
    }
    else
    {
        /* Get address to templates directory in the root of this project*/

        templateDirectory = path.resolve( __dirname,
            "../templates",
            mapToTemplates[ config.template ] );
    }

    const CURR_DIR = process.cwd();

    config.templateDirectory = templateDirectory;
    config.targetDirectory = `${ CURR_DIR }/${ config.name }`;

    /*Check if we can access the templates folder */
    try
    {
        await access( templateDirectory, fs.constants.R_OK );
    }
    catch ( error )
    {
        console.error( `${ chalk.red.bold( "ERROR" ) }  Invalid template name` );

:        process.exit( 1 );
    }

}
Step 4: Let us configure a list of tasks to perform based on our config object.
The tasks we need to run are:
Copy template files to target directory.
Initialize git, if enabled.
If our template includes a package.json, update the
namefield.Install dependencies if allowed.
In our createProject function, add the following:
    //Configure our task list
async function createProject ( options )
{
   ...

    const tasks = new Listr(
        [
            {
                title: 'Copy template files',
                task: () => copyTemplateFiles( config ),
            },
            {
                title: 'Initialize git',
                task: () => initGit( config ),
                enabled: () => config.git,
            },
            {
                title: 'Update package.json',
                task: () => editPackageJSON( config ),
                enabled: () => config.template !== "basic",
            },
            {
                title: 'Install dependencies',
                task: () =>
                {
                    return projectInstall( {
                        cwd: config.targetDirectory,
                        prefer: config.manager,
                    } );
                },
                skip: () =>
                {
                    if ( !config.install )
                    {
                        return "No dependencies will be installed";
                    }
                }
            },
        ] );

    await tasks.run();

    console.log( `${ chalk.green.bold( "DONE" ) }. Project ready` );

    return true;
}
Step 4: Now in our index.js,
import askQuestions from "./questions";
import createProject from "./main";

export async function cli ()
{
    const options = await askQuestions();

   await createProject( options );
}
Step 5: Save all files and type generator into any command shell on your computer.
Congratulations!! 🎉🎉🎉🎉🎉
You can now generate boilerplate code with one command. Of course, you're free to add more functionality to the code to suit your use-case.
Repo for this tutorial can be found here.
Happy coding 💻.
A lot of points made in this post drew inspiration from Harriet Ryder's article over on medium and Dominik Kundel's post on twilio.*